|
Top
WICKS TO FIT THE HEATERS LISTED
BELOW - AND MORE!
Unique Specialty wicks
for
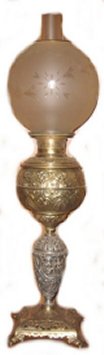
19th Century lamps
|
 . . . .
World's Largest Selection of Wicks!
Wicks for virtually every heater, stove and lamp made since 1850
MAINTENANCE - KEROSENE
APPLIANCES
Preparing your
kerosene heater for summer storage is a regular maintenance routine
that absolutely should be done every year, thus ensuring the heater is
in perfect condition for use. And the same maintenance items
should be checked to ensure the heater ready for winter use.
Properly cared for, your heater will last for many decades. Some
Perfection heaters are used every winter after a century of use...with
proper care for storage during the summer.
It isn't hard or
complicated to properly prepare a heater
properly.
Regular maintenance
of kerosene appliances involves care
of the wick, the wick raising assembly, plus the main
body of the appliance itself.
Wick raising (and lowering)
assembly:
I have seen fiberglass
wicks with so much tar buildup on top that they cannot be
withdrawn into the wick raising assembly, ratchets and
levers so dirty they could not be moved, even wicks
rusted to the center support column! All of those
are the fault of the user, not the heater
or stove. The wick raising assembly can be carefully
scraped and then cleaned with an old toothbrush and
kerosene and wiped dry. "Tri-Flow" (or silicone)
penetrating lubricant can then be sprayed on all moving
parts; when it dries it leaves a film of Teflon and
silicone, and that will keep it working for well for
another year. If there is rust present on the
central post assembly because someone stored the unit wet
(with fuel in the tank) and water condensed and was able
to get to the carbon steel pillar around which the wick
fits, then wire brush the rusted area and sand it smooth
with fine grit emery paper.
The area around the wick
gap (below) often gets tar or carbon deposits, which can
be cleaned off easily when cool and therefore
brittle.
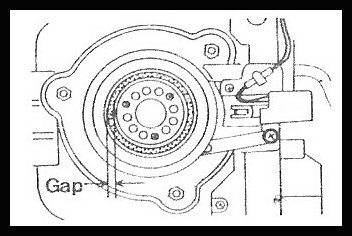 |
Wick raising assembly at left, igniter with
electric wire leads shown on right side of
illustration. Trace those wires and clean
all the contact points all the way to the battery
terminals.
|
The Electric Ignition
system
Virtually all
kerosene heaters use 2 batteries (C or D size) to provide
the electricity to heat the igniter to light the
heater. The contact points of this system can
corrode, so they do need periodic attention. The
best electrical contact cleaner I have found is Tronic
Kleen Plus Lube, available from Radio Shack
stores.
Remove the
batteries, spray with the "Tronic Kleen Plus Lube," and
wipe dry. Trace the wires from the battery and you
should find a long, flexible copper contact strip which
is touched by the igniter contact when you move the
ignition lever. That copper strip can become
corroded, and then the lighting system will not
work. Light sanding with fine grit emery cloth will
restore the copper surface, then spray with Tronic Kleen
Plus Lube, wipe dry, and it will be protected against
corrosion throughout the heating season.
Most igniters
resemble a flashlight bulb with the glass removed and a
tiny resistance heating coil on the top. That
heating coil can become corroded, clogged with debris, or
break. The igniter can be checked for proper
operation by replacing the batteries, moving the igniter
operating lever, then observing if the heating coil glows
red hot. For maintenance, remove the igniter, spray into
the contact receptacle with Tronic Kleen Plus Lube, then
replace the igniter. If the igniter is damaged, it
should be replaced with the correct
igniter - there are four different types of
igniters!
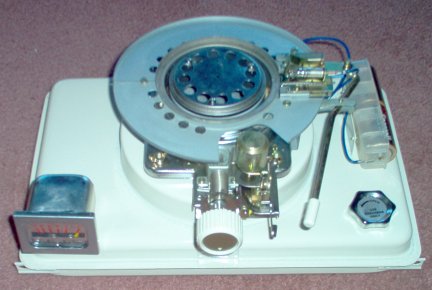 |
The photo at
left shows an Everglow P-E12 fuel tank with
attached wick raising system and the electric
ignition system on the right. The lever is
moved to the right, which moves the igniter to
the left to contact a copper strip contact point
and then the raised wick. I bought the heater as
unused on eBay in late August, 2006. The
ignition system did not work, which was probably
the reason it was sold. A continuity tester
showed good contacts. The batteries produced 3.2
volts at full amperage...and didn't work.
The batteries were shorting themselves out!
I replaced the batteries and it works just
fine. Click photo to enlarge.
|
When the kerosene
heater is prepared for storage for the summer, remove the
batteries and clean all the electrical contact
points. Before use in late autumn, the electric
starting system should be in good condition, awaiting
only the installation of new batteries.
The
Appliance Body
Virtually all kerosene
heaters and stoves are made of steel, either painted or
enameled for a pleasant appearance and rust
prevention. Most modern heaters have a baked enamel
finish. "Perfection" heaters were painted, and as a
result will rust easily...they should be cleaned and
polished twice a year. When the appliance is being
prepared for storage, it should be burned dry
(not Perfection heaters!), then completely
disassembled. The body of the unit, including the
stainless steel reflectors on radiant heaters and
stainless steel grillwork on convection heaters, should
be cleaned and polished with a good grade of auto
polish/cleaner: my favorite is "Meguiar's Cleaner/Wax,"
which the maker claims is America's top selling
cleaner/wax. It's cheap, and it works. Don't forget to
polish the inside of the metal cabinets, as they
are often unpainted and rust easily if not protected with
metal polish. The auto polish will seal the pores
of the paint and steel, greatly reducing the chance for
rusting.

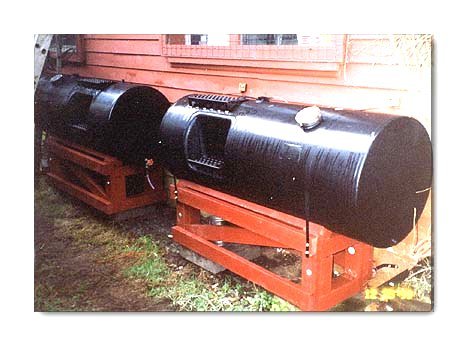
This
heater has been used to heat my shop for 10 years,
and is as pretty as when new.
If rust is present. First, if the rust is not
too extensive or deep, a small brass brush is used to
remove all rust scale and debris. Be sure to remove
any enamel, paint or chrome from the edges of the rusted
area. The area can then be sanded to remove high
spots and "feather" the edge of surrounding
paint.
If the rust is
severe. From George C, a reader.
1/15/08. "Well sir I have been using this product
called Evapo-rust for over two years at work to clean
gage pins. I took the whole wick adjuster and safety
shutoff along with the igniter and soaked over night. it
works like a new one and trips just great. If it had not
been for this stuff would not have been able to salvage
the heater." http://www.evapo-rust.com
To protect the
areas you have cleaned, they must be neutralized to
prevent the oxidation from eating right through the
metal. "Ospho" (phosphoric acid) neutralizes
rust, and is available in many hardware stores. Use
a small, cheap paintbrush and carefully apply a thin
coating Ospho to the cleaned rusted area. Do not
spill any Ospho on painted surfaces or they will be
stained! Ospho needs a temperature of about 70 F to
properly dry. You will know the Ospho has worked
and is "cured" when the rust turns very dark and is no
longer tacky to touch. That area should not rust again,
particularly after the application of a good coat of
paint. Thanks, Tom!
Paint:
A good quality engine block paint rated at 1200 F will
normally work very well, but color matching is
difficult. Tom Poserina found that Chrysler 300
White touch-up paint from Wal Mart was a perfect match
for the paint on the fuel tank of his Omni 105
"E".
Note from a
reader: 1/26/2012
I thought I'd also
mention I found an almost identical match to the
off-white color Toyotomi used on their Radiant
series. I went to one of our local O'Reilly stores
(national chain of auto part stores) and found a can of
Dupli-Color's "Perfect Match" series of automotive
sprays; their "Wimbledon White" color for Ford vehicles
is a dead ringer for Kero Sun's. It was actually cheaper
to buy a spray-can than the little touch-up paint tube,
so I used the old technique of simply spraying enough
onto some cardboard until it pools and used a broken
toothpick to apply it to the chipped areas of the
heater. Just thought you might be interested in
passing it on. Thanks again for all the hard work
you do maintaining your website. It shows that you
care about the products you sell!
Travis G.
Flame_Spikes
|
|
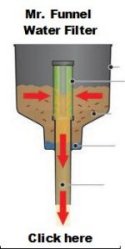
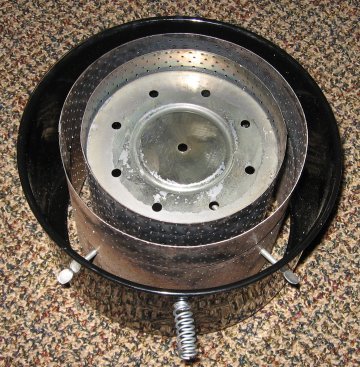
The two inner
cylinders of the catalytic converter are spaced so
that one fits inside the wick and one fits outside,
so the wick is between the two perforated
cylinders. The wick bring fuel to the base of
the cylinders through capillary action. When
the catalytic converter is up to operating
temperature, the fuel vapor is combined with oxygen
flowing through the perforations. The flame
is then between the cylinders,
not from the wick - the rings
convert fuel vapor to clean,
virtually odor-free flame heat.
|
The two steel
cylinders of the catalytic converter are soft and easily
damaged. Even if made from hardened steel, the heat
produced by the stove in use would quickly anneal the
cylinders and make them soft. Normal bouncing
during transit, storage or use can result in nicks or an
uneven bottom edge of the converter rings. If
the bottom edge of the burner rings is not perfectly
flat, an air leak and cause extra oxygen to enter the
space between the cylinders, upsetting the delicate
air/fuel mixture and causing an flame spike. And
that air spike will cause sooting if it is high enough to
impact the bottom of a pot or pan.
An "flame spike" can be caused by
too high a wick as well as an air leak. To
determine the problem, grab the wire handle (see photo
above) on the catalytic converter and move it slowly from
side to side while watching the flame. If the
flame spike does not move, the cause is a wick too high
at that location - the wick is not level.
Remove the wick and reinstall it so it is level on
top.
If the flame
spike moves with the catalytic converter, the cause
of the flame spike is an air leak from the base of the
burner. That is relatively easy to fix. Place
a new sheet of sandpaper of 120 to 150 grit on a flat
surface, like a Formica countertop. Place the
catalytic converter base down on the sandpaper close to
you and hold an edge of the sandpaper down against the
countertop. Then gently stroke the catalytic
converter away from you, one stroke only!, while keeping
the catalytic converter as flat as possible. Lift
the catalytic converter and return it to the near edge,
then make another stroke. Now examine the bottom
edge of each cylinder. The shiny spots were high
spots that were sanded down. The dull places are
too low and will cause an air leak. Repeat the
sanding strokes until both cylinders are shiny rings all
the way around. Bingo, no air
leak.
Corona 22-DK wick sleeves.
|
Corona 23DK wick
sleeve. The Corona 22DK was a transition model using an
unpinned wick and a pinned wick sleeve. That pinned wick
sleeve was very fragile as the pins could easily break off.
The sleeve can be drilled where the pins were located and the
heater will then work using pinned wick #3B for the 23DK, or I
have new 23DK wick sleeves.
Click
here. |
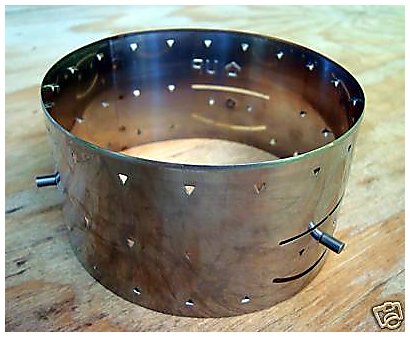
Corona 22-DK wick sleeve - no longer available. |
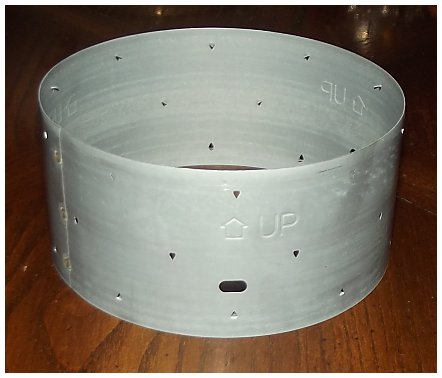
Corona 23DK wick sleeve |
FIXING A LOOSE CARRY HANDLE
ON A CONVECTION HEATER
Many, if not most
convection heaters have a carry handle in the shape of a
"U" which attaches to the heater by simply slipping into
holes on each side of the tower assembly. The problem is
that one side of the carry handle can slip out and the
heater can be dropped. This problem is almost
universal...and extremely easy to fix. Remove the
top safety grill, then the top plate on the heater.
Now you can look down into the heater and see the ends of
the carry handle protruding through the metal sides of
the heater. Slide a 5/16" washer over each end,
then a 1/4" "Kwik-Clip" over each end and slide it back
as far as you can, and the carry handle will not be able
to come loose again. Some carry handles are less
than 1/4" diameter chromed rod and would require a
smaller "Kwik-Clip," and they are available in just about
any small diameter.
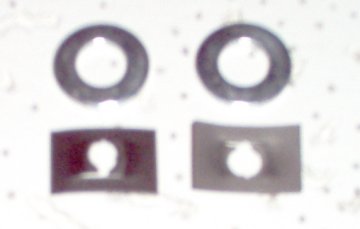 |
The photo at left shows 1/4" "Kwik-Clips"
and 5/16" washers. The "Kwik-Clips"(also called ''Speed Nuts") are part
#08236 00661 or 08236 00672 at True Value Hardware stores, and
cost all of 15 cents each. The 5/16"
washers are 5 cents each. For 40 cents you
can solve an aggravating problem!
|
You're
done....
The unit is now cleaned
and polished, the mechanical wick raising assembly
cleaned and lubed as is the electric starting system, and
the appliance body polished and thus protected against
stains and rust. The fuel tank is empty, so water vapor
will not condense in it and cause rusting. You removed
the igniter batteries when you removed the cabinet body,
so no galvanic corrosion should take place in storage.
And you have examined the wick, and if replacement is
needed, now is the time to at least order the proper
wick. Now the unit may be safely stored -- covered!
-- in a dry area, and you can be certain your kerosene
heater will be ready for use just as soon as you need it
again.
Is this
all really important?
Yes. I have had to
practically rebuild convection heaters from scratch for
friends because they were simply put into a damp
outbuilding after the last use. They were rusty and a
real mess, and there is no excuse for it! A few
years ago I was given a Toyotomi RCA-87 radiant heater
for free. It had been put away wet -- in a barn
loft, under hay bales. It was rusty and dented, the
electrical starter system so corroded it could not be
fixed, with mouse nests in the wick raising assembly
area. I was able to make it work again, but it wasn't
worth the effort...a $200 heater ruined for lack of a
half hour of maintenance work!
If you follow the
guidelines above for regular maintenance before storing
your kerosene appliances, they will keep in pristine
condition and be ready for use within 20 minutes of when
you need them -- just fill with fuel and install the
batteries.
QUESTION FROM A READER:
Thanks for the wicks
and igniter you sent. They're great. I have one heater that despite
using contact cleaner on the ignition system, I can't seem to get it
to work. Is there a way that I can remove the entire system from the
heater in order to more closely inspect it without damaging it beyond
repair. And do you sell anything I could use to clean the fuel tanks?
They're not terribly dirty, but as long as I'm this far into it, I may
as well do it as best I can. Thanks again, Miles! Jeff in
Dry Fork, VA
ANSWER:
You need an inexpensive electrical tester for the
ignition system. And you will probably need a third hand to help you
because you need two hands to hold the leads and someone else to push
down the igniter button when you get to that point.
Without batteries installed, use the continuity tester for the + and -
on the battery box, then each wire up to the connector. Then test the
continuity through the switch while someone engages the igniter to
full on. That will isolate the bad connection. Then you can use 600
grit emery to clean the contact. Reinstall the batteries and check
for voltage at the battery box, at the igniter itself as well as at
the first connection. It should read very close to 3 volts DC. Often
the bad contact is right in the center of the plug socket itself - the
positive wire. Insert a pencil-style ink eraser into the plug-in and
twist it to clean that contact. Go gently and do not bend the folded
copper contact at the bottom of the receptacle down to far or it will
not make contact with the base of the igniter. Run your final voltage
check from the center probe in the receptacle while holding the
negative contact on the outside of the socket while someone engages
the igniter.
The fuel tanks are not difficult to clean. Kerosene is not called
"paraffin" in Europe without a reason: kerosene precipitates paraffin
and other waxes. The waxes, being tacky, almost attract and hold all
kinds of detritus. Nothing dissolves those waxes, but they generally
melt at less than 180 degrees F. Boil water in a tea kettle until it
whistles at 212 F, then pour into the tank. Replace the cap, swish
around quickly, then pour out. All kinds of melted stuff will pour
out with the almost-boiling water. Repeat several times. Finally, to
remove residual water, pour in at least a cup of 91%+ alcohol, swish
around, and pour out. Air dry with the cap off before use.
Back to top of page
|
Home Page
Site Index
Kerosene Heater Wicks:
Kerosene Heaters
Lamps
Home Page
Site Index
Photo Album
Photos of
Wicks
Mail Order
Form
Back to top of page
Kerosene Stoves, Lanterns and Ovens
Kerosene Stoves -
Recommendations on different models
New!
Kerosene
Stove Maintenance and Storage
Butterfly A-822, 22 wick, all-aluminum
premium stove. New!
Butterfly #2487, 16 wick stove. Butterfly #2412 Pressure
Stove;
instructions for virtually any pressure stove.
Butterfly #2418
Double Burner Stove;
good with any gravity flow stove.
Butterfly #2421
Oven for Kerosene Stoves
Butterfly #2641, 10 Wick Stove
-
the least expensive emergency stove.
Butterfly #2698 Cook Stove -
THE Best Heavy Duty Cook Stove. Butterfly
#828R Pressure Lantern;
same for most pressure lanterns.
|