|
 |
UNPACKING: After unpacking, remove screen
(#10) by turning to right. Fasten bail or hanger (#9) in
eyelets on screen retainer (#3). Fill with best grade water
white kerosene to 1/2" below filler cap (#2).
LIGHTING: At each lighting, remove screen
(#10). Apply one tablespoon full of denatured alcohol to
Primer Wick (#6). Replace screen (#10) and light by
inserting match in lighting gate (#5). Kerosene can be used
for priming (if alcohol is unavailable). IF kerosene is used, the
primer wick must be lit with Screen (#10) off and Screen MUST NOT
BE REPLACED until primer wick is entirely BURNED OUT.
ADJUSTING FLAME: After priming alcohol
has burned off, adjust flame by opening filler cap (#2) until
flame rises just over the round baffle on top of inner shell (#8).
Flame adjustment is controlled by quantity of air passing thru
holes in filler cap (#2). When flame is properly adjusted, mark
filler cap so that future adjustments can be made instantly.
|
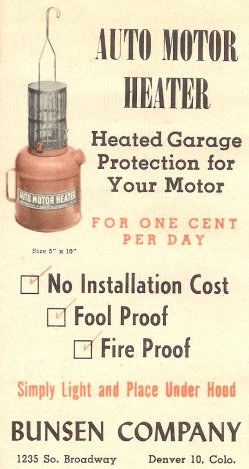
PLACING HEATER IN CAR: Attach asbestos sheet
(#11) by slipping over hook of bail (#9). Hang heater to cross
bar under hood if convenient. If not, place in LEVEL position.
TO EXTINGUISH: Remove heater and place
snuffer can over screen (#10). Leave snuffer can on screen until
next lighting.
TO REPLACE WICK: If wick becomes carbonized,
remove screen (#10), inner shell (#8), and outer shell (#7). Remove
wick assembly by lifting out burner head (#4). Loosen hard
carbon on wick by scratching with pointed instrument. This will
lengthen life of wick temporarily. THE TOP OF THE WICK SHOULD
BE FLUSH WITH WICK CONTAINER TUBE AT ALL TIMES. If wick
cannot be brought up flush with wick container tube, we recommend
purchase of a new wick.
TO USE AS EMERGENCY ROAD FLARE: Remove screen
(#10) and inner shell assembly (#8),. Light center wick.
KEEP HEATER UPRIGHT AT ALL TIMES
CAUTION: If kerosene splashes thru burner head and
soaks primer wick the heater will smoke and soot up. (If primer wick
should get soaked with kerosene, remove screen, light primer wick and
allow it to burn completely out.) Screen must be free of soot at
all times.
If screen is punctured in any way, the burner is
not fireproof until screen is replaced with new one.
DO NOT ALLOW HEATER TO BURN COMPLETELY OUT OF FUEL.
THIS ACTUALLY BURNS THE WICK, DESTROYING IT OR SHORTENING ITS
LIFE.
COVER HOOD AND RADIATOR WITH BLANKET OR TARPAULIN
to prevent heat from escaping. (You can't heat a room with the
windows open.)
Do not be alarmed if heater smokes on first
burning. The preserving oil must burn off the screen, lasts only
two minutes and is non-recurring.
IF HEATER BURNS IMPROPERLY, DO NOT LIGHT IT AGAIN
UNTIL:
1. Carbon has been scraped from wick (#4).
It is vitally important that wick is flush with opening in metal wick
container if perfect combustion is to be obtained. If in
scraping the carbon the wick is slightly below the wick container, the
unit will function temporarily. A new wick assembly should be
installed as soon as possible.
2. All soot and carbon have been removed from
shells (#7) and (#8) and burner head (#4).
3. Screen (#10) has been thoroughly cleaned.
(The proper air mixture will not feed through a dirty screen.)
4. Shells (#7) and (#8) are properly seated.
THEN LIGHT AND THE HEATER IS AS GOOD AS NEW
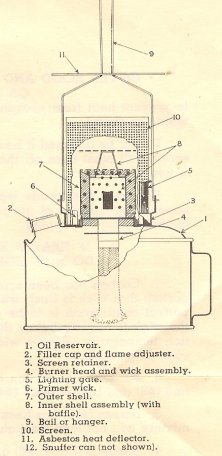
TO ASSEMBLE BURNER HEAD
1. Insert Wick assembly (#4) in Oil Reservoir
(#1).
2. Seat Outer Shell (#7).
3. Seat Inner Shell Assembly (#8).
NOTES FROM MILES STAIR
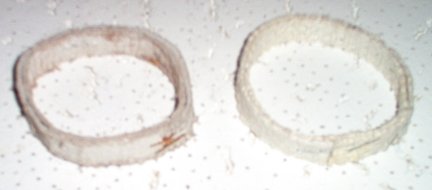
The Primer Wick (#4) mentioned above.
The one pictured above left is an original factory replacement, two thin strips of asbestos stapled together at the ends
forming a circle approximately 2 1/2" in diameter using 7 1/2" strips
of asbestos. The Primer Wick on the right I made using thicker and
stronger asbestos. Nothing other than asbestos will work for
this job, as asbestos is an absorbent mineral and will not burn.
Asbestos dust can be hazardous to your health, so handle carefully.
Auto Motor Primer Wick, asbestos.
I take no responsibility for the use of asbestos wicks.
|
$16.95 |
|
Auto Motor Heater Wick, cotton. 3/4" x 8".
Cut
in half it makes two wicks with trim-to length of 4" |
$9.95 |
|
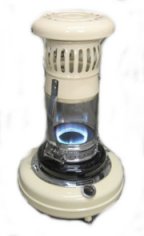
If you see an Auto Motor Heater for the first time,
it looks just like an oversize metal lamp with a weird screened
chimney. In fact, Auto Motor Heaters DO NOT operate like a
kerosene lamp! The actual design function is for the burner head
and inner shell assembly to be preheated with alcohol from the primer
wick, and then the Auto Motor Heater will operate more like a pressure
stove, drawing fuel from the wick, but not actually burning the wick.
The primer wick is an essential part of the operation of an Auto
Motor Heater. Without the primer wick and preheating with
alcohol, they are an inefficient, smoky device that does not produce
much heat.
The Asbestos Heat Deflector (#11 above) was not available from the
factory after the 1950's, and is almost never found today. Keep
the heater at least one foot below any painted surfaces or anything
combustible.
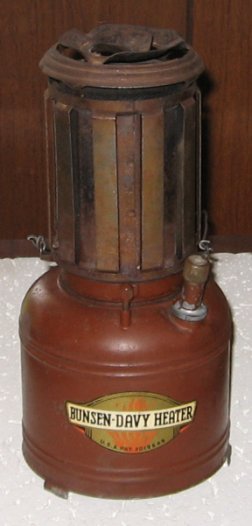
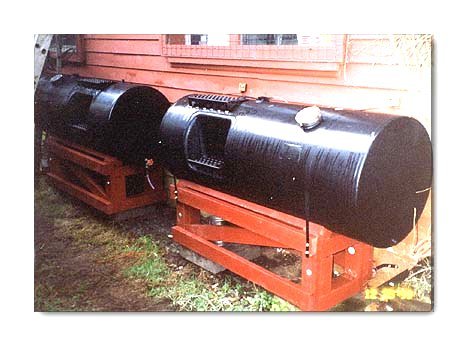
Bunsen-Davy Motor Heater
The Bunsen-Davy Motor Heater
operates on an entirely different principle than the Auto Motor
Heater above. Rather than using a solid 3/4" diameter wick,
the Bunsen-Davy is actually a center draft style quite like an
early P&A Royal center draft lamp - it
is essentially a center draft lamp with a metal chimney - and uses
a 1 1/2" diameter center draft lamp wick! The "chimney" is a
strong series of baffles over a sturdy screen. That screen
is what makes the Bunsen-Davy safe to use in a relatively confined
space without worrying about a plume of heat starting a fire in
the engine compartment of a tractor or truck. There is no
room in modern car engine compartments for this motor heater, but
placed in front of the vehicle in a closed garage it would keep
the radiator from freezing at reasonable temperatures. Inserting a new wick
in a Bunsen-Davy heater requires patience. Three long "fingers" extend up from a ring around the center draft tube to grab the wick. The rod
shown in the center of the photo at right is pulled up to raise the wick: The rod is connected to the ring inside the tank and move up or down with the rod,
the "fingers" (sharp points inward) grabbing the wick to match the rod
movement. The wick must pass between the draft tube and the ring, and that gets tricky. Long, thin forceps or tweezers can help guide the wick inside
the ring so it can extend to the bottom of the tank to pick up fuel. |
 |
