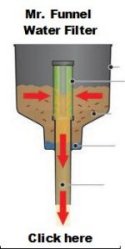
|
WICKS TO FIT THE HEATERS LISTED
BELOW - AND MORE!
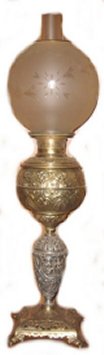
Unique Specialty wicks
for
19th Century lamps
|
 . . . .
World's Largest Selection of Wicks!
Wicks for virtually every heater, stove and lamp made since 1850
HALLER STOVES
(Click
here for Haller HEATERS)
Haller "Origineel"
kerosene stoves were originally made by Georg Haller Co
of Ottensen (Hamburg), Germany. Haller stoves date from
circa 1900, but some
variations (clones) were made in the former East
Germany and are marked DRG. Production apparently ceased by
1975. Some clones have been found with the name "DOETINCHEM," a
large Dutch city, and may have some connection with the later
Dutch Haller
heaters.
The need for these stoves in the early 1900's was
manifest. The Industrial Revolution in Europe was in full vogue,
with rural residents being displaced to the cities to find work, so
virtually any habitable structure was considered livable even without
a kitchen. In those conditions, a Haller stove was
indispensable. The most common Haller stove encountered is
the single wick design, but models with 2, 3 and even 4 wicks were
manufactured. All of the variations I have encountered used the
same wick, however.
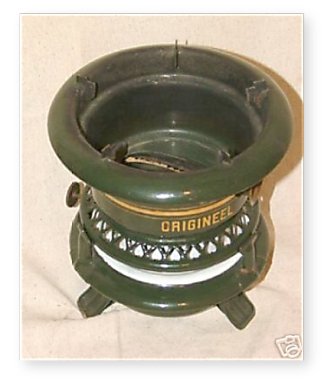
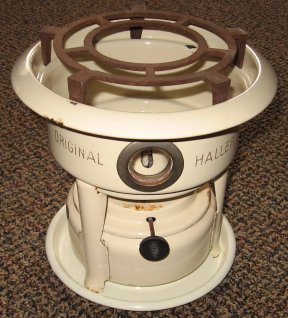
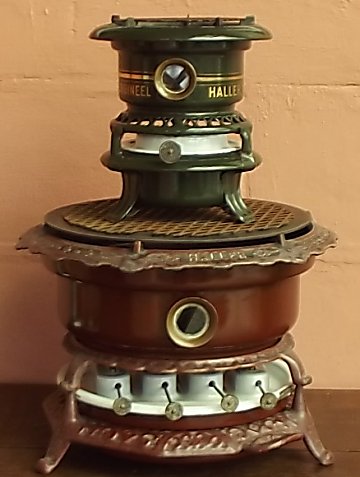
Haller stoves are
of enameled steel construction. The white area
visible at the bottom of the stove is the wick holder,
and the venting visible allows a considerable amount of
fresh oxygen to feed into the 2 3/4" flat wick.
These stoves burn very clean and odor-free providing
water clear 1K kerosene is used. The fuel reservoir
is primitive, however, being nothing more than a basin
for the wick, and care must be taken to prevent
spilling.
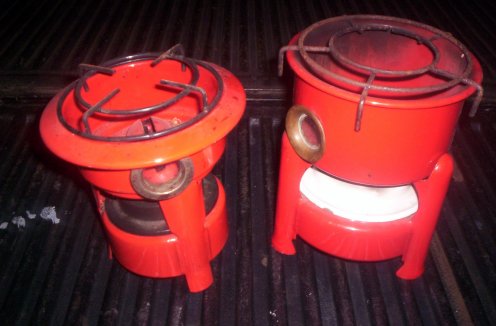
There were at least three grades of Haller stoves.
In the photos directly below, the
single burner at left is of obvious higher quality than the four
stoves on the right. The
all-stamped steel 4 burner below right is considerably lighter and
made less expensively than my
newest 4 burner shown in the bottom photo on this page, with
excellent cast iron parts and very heavy, thick metal. A good
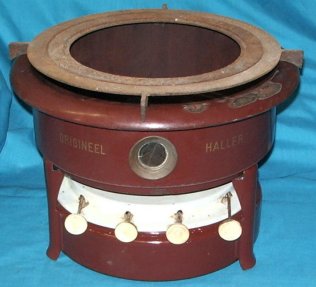
mid-range stove is the
blue Haller
below, still stamped steel but heavier and thicker than the
cheaper versions at top right.
Haller stoves
require a thin, 2
3/4" flat wick as they have precision gear wheels
and a narrow wick sleeve.
|
|
 |
|
|
|
Mint
condition single burner, pre-WW I, single
wick
|
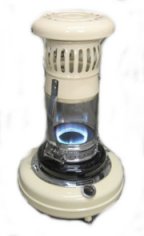
Post
war East German variations, single, double
wick. Can be found labeled "Beccon
Origineel"
|
Pre-WW II variation, single wick (see photos
below)
|
Four wick version,
circa WW I
|
|
|
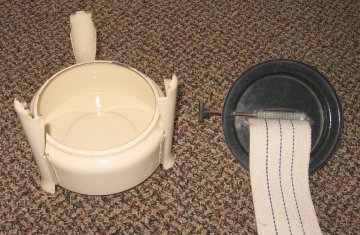
Assembly photo
#1: At left, the top piece is removed from the
base. The pot/pan support has already been
removed. The simplicity of the design is
readily apparent: Note how easy it is to
clean the various parts. And you can see that
where the enamel chipped, rust appears.
Considering that this stove was in use for decades,
however, proves the sturdiness of the basic
design.
|
|
|
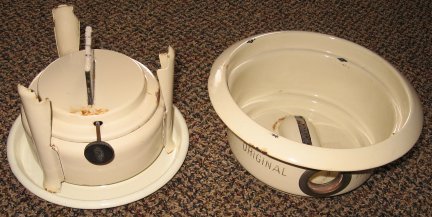
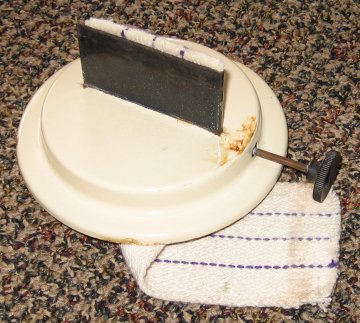
Assembly photo
#2: The wick assembly removed from the fuel
reservoir. The reservoir is an open bowl,
easy to fill and clean, and just as obvious is that
care must be taken when in use so that fuel does
not spill. In this photo the base has
been removed. For cleanliness in storage, the
base fits perfectly over the upper heat chamber,
above right in photo #1.
|
|
|
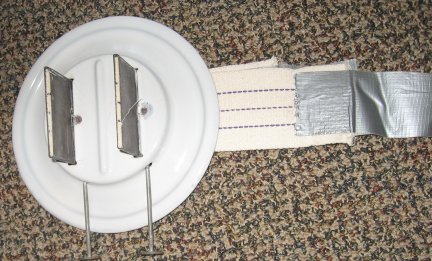
Assembly photo
#3: A new wick has been installed.
Because of the tall constricted wick slot, pushing
a wick into place through the wick raising gears is
extremely difficult. It is vastly easier to
pull the wick through from the top. I use a
6" piece of duct tape, with one inch on each side
of the wick and the remaining 4" pressed against
itself to form a thin wick extension. The
duct tape easily slides through the wick slot and
the wick is then pulled into place. Note that
I bevel the edges of the wick to make it easier to
pull through the wick gap in a straight
line.
|
|
|
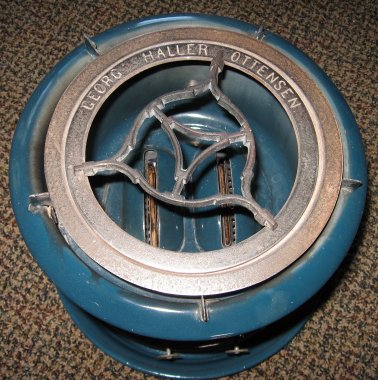
Haller stove, a recent addition to my
collection, a two wick
model with all the pot/pan support rings
intact. Each ring can be removed to fit the
size of the bottom of the pot or pan. The center
support is for small pans. The inner ring clearly
says Georg Haller, Ottensen. Click photo to
enlarge.
|
|
|
The photo at
left shows the easiest way to install new wicks in
a Haller stove. Note the duct tape extensions
on the wick. The duct tape is pushed through
the wick slots from the top, the wick pulled down
level with the top of the wick tubes, then the duct
tape can be removed.
|
|
 |
My
latest Haller stove, a four burner, with a pristine single
burner on top to illustrate the relative size. This 4
burner was Haller's primo model, more of a range than a
pedestrian stove. This grade had three sections of cast
iron excluding the burner plates on top, and very heavy gauge
enameled steel. The little single burner stove may weigh 2
pounds, but the four burner weighs over 20 pounds! This
large, heavy stove was brought to Canada by German immigrants
before the Great War of 1914-1917 and kept in the family until
finally sold in 2012. |
|
Haller Stoves used 2 3/4" wide,
relatively thin
wicks.
|
Back to top of page
|
Home Page Click Here
Heater Information below
Lamp Wicks:
Center Draft Wicks - Wicks
available only from this Wick Shop.
Flat lamp wicks
Aladdin Lamp Wicks
& parts
Lamp Chimneys:
Center Draft Lamp
chimneys
from "Tiny" Junior to Mammoth lamps.
Fabulous "Sans Rival"
borosilicate chimney for 14''' Kosmos lamps
Student Lamp Sans Rival Chimney with
1 7/8" fitter!!!
Standard glass lamp chimneys
Sonnenbrenner Lamp Chimneys
Information on lamps:
Center Draft Kerosene Lamps
(Photos, information and history, etc)
Photos of
restored center draft lamps
Care, Feeding and Restoration of Center Draft
Lamps
(and wick
installation for many)
Center Draft
Lamp manufacturers and brand names
Lamp Chimneys
- Dimension of
nominal base diameter by make, model and "line".
Early American Metal Font & Specialty Lamps
Aladdin Lamp History
Aladdin Lamp Wicks & Chimneys,
Aladdin - Exploded burner views
Kosmos-Brenner lamps
and wicks
Flame Spreaders and
"Smoke
Consumers"
from Alex
Marrack
- Vulcan, Imperial, Veritas,
Belgian, Hinks, Messenger's, Young's Court, etc.
Articles by Alex Marrack:
Home Page
Site Index
Site Index for all things Perfection
Kindler Wicking For Oil Stoves & Ranges
Kerosene Heaters
Alphabetical list of most kerosene heaters and the proper wick,
& cart checkout.
List by wick number and the heaters that fit them. (A
helpful guide for buying on eBay)
Measurements needed if you have an unlisted heater.
Care and Maintenance of Kerosene Heater Wicks
Installing Kerosene Heater Wicks - generic for unpinned
wicks
Owner's_Manuals & information for many kerosene heaters
Kerosene
Heaters - General types, how they work, recommendations
for some good ones - and those I would avoid.
Economic Benefits of
Kerosene Heaters
Kerosene
Heater Safety
Regular
maintenance
Troubleshooting kerosene heater common problems
Breaking
In New Kerosene Appliances
Burning
Kerosene Heaters at Night
WATER IN KEROSENE causing "dwindling" and poor
performance.
Flame Spreader Heaters
and Lamps -
A Century of Excellence
Kerosene Heater Carts
-
why carry your heater around?
Kerosene Fuel Primer
Sweet
Smelling Kerosene
Kerosene tank cradles
(photo)
Building a Cradle
HALLER "ORIGINEEL"
STOVES
KEROSENE
HEATERS MADE IN THE NETHERLANDS
Beatrice Boiling Stoves & Mini kerosene heaters
you can make
Sad Iron stoves; Wicks &
Installation instructions
Wicking For Oil
Burning "WICKLESS" Stoves & Ranges
Photo Album
Photos of
Wicks
Mail Order
Form
Kerosene Stoves, Lanterns and Ovens
Kerosene Stoves -
Recommendations on different models
Kerosene
Stove Maintenance and Storage
Butterfly A-822, 22 wick, all-aluminum
premium stove.
Butterfly #2487, 16 wick stove.
Butterfly #2412 Pressure
Stove;
instructions for virtually any pressure stove.
Butterfly #2418
Double Burner Stove;
good with any gravity flow stove.
Butterfly #2421
Oven for Kerosene Stoves
Butterfly #2641, 10 Wick Stove
-
the least expensive emergency stove.
Butterfly #2698 Cook Stove -
THE Best Heavy Duty Cook Stove.
Butterfly
#828R Pressure Lantern;
same for most pressure lanterns.
Back to top of page
|