|
Wicks for Aladdin Blue Flame Heaters |
|
|
|
Aladdin Lamp wicks, parts and
mantles, click > here < |
|
UPDATE Oct. 22.2020 - Aladdin has raised their prices on most items
and have threatened me to keep my prices to their high
''standards'' (MSRP) or they will sell me no more products. I do not
purchase Aladdin heater wicks, lamp wicks or chimneys from the US Aladdin lamp
importer so I can sell
them below their MSRP. The new MSRP for Aladdin Blue Flame
heater wicks is $33.95!!! |
|
Wick number |
Fits these models: (For other Aladdin heater
models,
click here) |
Mail Order
Form |
|
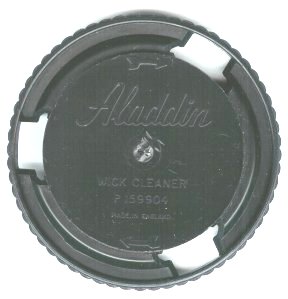
3" Cleaner |
"Wick cleaner" for Aladdin Blue Flame
heaters using 3" wicks #37 or
#37A. Aladdin part #P159904, made in England. Using
the wick cleaner. OUT OF STOCK |
|
|
1" Cleaner |
Wick cleaner for 1"
Aladdin heater wicks. Part number R111. $9.95 @ |
|
|
Mica |
Round 3 1/4" dia. mica window for
Blue Flame heaters.. From Aladdin.
Aladdin part #P151603. $9.95
@ |
|
|
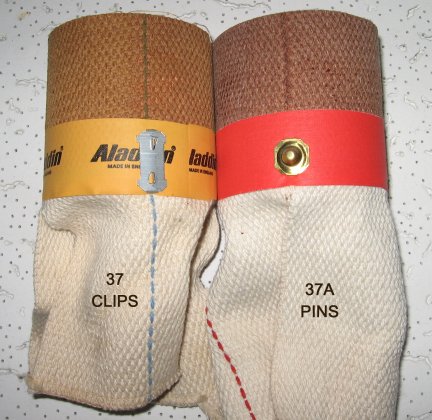
37 |
Blue Flame 3" diameter heater wick with rectangular
clip fittings (Japanese Blue Flame); JH 210 (P169901) Series 16, 25
(UK), 32, 37 and 39 (P169901) Made in Japan, some assembled in
Canada (Aladdin MSRP $33.95!) My price is $19.95 each. |
|
|
37A |
Series 8 & 15 Blue Flame
(made in UK or Iran) H210, 42201, 42202, 42203;
Blue Flame
3" diameter wick with two round pin fittings; P159905, P150051; P150056 Standard (Pastel Green);
P150060 Deluxe Blue Flame (Cream); 42201/A Standard (Pastel Green);
42203/A Deluxe (Cream and Chrome); P150080 (1001) Economy Cooker Heater (Iran); Outdoor Cooker Heater H2201 (Pastel Green)
(Aladdin MSRP $33.95!)- my price $19.45 each. [Hard to find OEM Aladdin Wicks #P159905] |
|
|
 |
 |
|
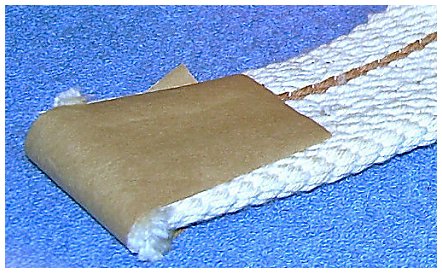
Note: Aladdin's instructions, even those
printed on new boxes, say
"8. Tear paper tabs from wick."
Aladdin wicks used to have paper tabs on the bottom of the wick
tails, as shown at right. New wicks do not have the paper
tabs but the directions have not changed, driving people nuts
trying to find some paper to remove. |
 |
|
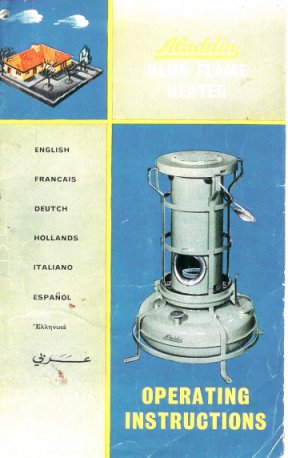
The instructions below were taken verbatim
from a 1960's Aladdin Blue Flame Manual.
"Paraffin" is what in the
US is known as 1K clear kerosene. A much more complete
Blue Flame Owner's
manual in Adobe format was
kindly provided by Monte Brueggeman. Also
Aladdin Blue
Flame Owner's Manual, multilingual, in English, French,
German, Dutch, Italian, Spanish and Arabic. Kindly
provided by Carlos Duarte in Paraguay. |
|
This heater is manufactured in accordance
with British Oil Heater Regulations 1966, British Standard
3399:1963 and other national and international safety
standards and regulations where relevant. However heat
is produced carelessness and ignorance can cause accidents
so, for your own comfort and safety, please read and
understand these instructions before lighting your heater.
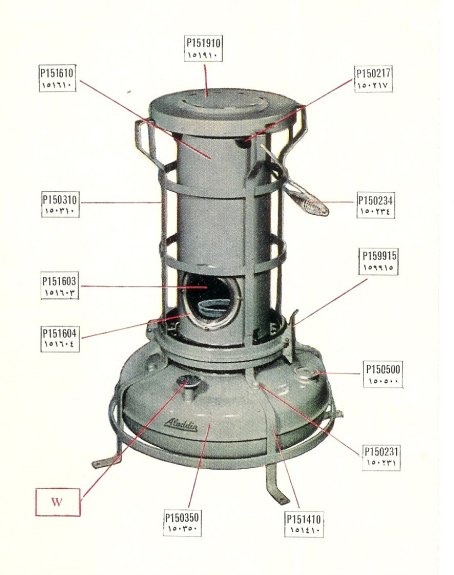
The numbers in brackets in the text will help you
identify parts on the illustrations. The illustrations
are on the last page and are identified by symbols in the
margins of the text. |
 |
UNPACKING
We have been generous with the packing to make sure
that your heater gets to you without damage; make sure you remove all
the packing before you start.
FILLING
The tank (P150350) will hold one Imperial gallon (1.2
U.S. gallons or 4-5 litres), and you must use only the best quality
paraffin (domestic kerosine). It is very dangerous to use any
other fuel, including power kerosine or gasoline. In the British
Isles use Aladdin Pink paraffin. Remember, put absolutely nothing
but clean domestic paraffin in your tank or storage container and make
sure it cannot become contaminated in any way. The filler cap
(P159911) unscrews. The oil gauge (P150500) indicates the
approximate amount of fuel in the tank and will warn you when the heater
needs refilling. Don't burn the heater dry because it will
seriously shorten the life of the wick. The black symbol shows
that the heater is full.
LIGHTING
When you use the heater for the first time, or have
fitted a new wick, do not light it for at least an hour so that the wick
has a chance to soak up enough paraffin. Release the clip
(P159915) and open the heater. There should be a flame spreader
(P159903) which has a lot of small holes in it, fitted in the center
tube of the tank. If it has fallen out or is not seated properly
it must be replaced and pushed fully home before the heater is lit.
Make sure the burner basket (P1599905) is locked fully into the tank.
The wick winder "W" turns clockwise to raise the wick (P159905) with
just enough wick showing (you should still see five rows of holes on the
flame spreader), light the wick all the way around and close the heater,
checking carefully that the clip (P159915) is properly fastened.
The burner reaches working temperature very quickly, so you should
immediately adjust the wick to give you the required heat within the
limits of the SAFE BLUE FLAME.
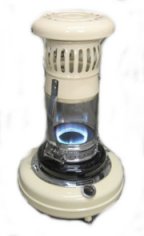
THE SAFE BLUE FLAME
Remember that your safety indicator is the colour of
the flame. When the flame is a clear blue all over you have got
the SAFE BLUE FLAME. When the flame shows any yellow the wick is
too high or too low or something is wrong with the heater; never let the
heater burn like this. This visual safety indicator is so
important and so simple to use that a little practice at first will
amply repay you. Short periods of yellow flame are not dangerous
so you can safely try the settings for yourself.
Turn the wick winder anti-clockwise until the heater
is almost out and you will get a flickering yellow flame; this is
too low. Raise t he wick until a completely blue flame is obtained
and then raise a little more so that it cannot revert to yellow; this is
the lowest setting for the SAFE BLUE FLAME. As you turn the wick
up more the blue flame will grow and you may notice a reddish glow above
the flame and possibly intermittent red flecks of burning dust.
This is quite normal. Eventually yellow spikes will appear at the
top edge of the flame to warn you that you have gone too far.
Lower the wick until you get rid of the yellow spikes and you now have
the highest setting for the SAFE BLUE FLAME.
LEAVING THE HEATER
As long as you have the SAFE BLUE FLAME you can
confidently leave your heater unattended, but do take a few simple
precautions against accidents. Place the heater out of draughts
and where it can't be knocked over. Make sure that children cannot
play with it. You and the heater both need oxygen so always
provide adequate ventilation to ensure you both get enough.
EXTINGUISHING
After you have turned the wick down to extinguish the heater, turn it
up again and look to make sure it is really out.
USING THE WICK
CLEANER
|
|
A good flame depends on a clean wick. The wick should
not be cleaned until it has been used for 50 hours or more.
Thereafter, about once a week remove the flame spreader
(P159903), turn the wick right down, and put the wick
cleaner (P159904) in its place the right way up. Whilst
turning the wick cleaner clockwise with one hand, slowly turn
the wick up with the other. Maintain a gentle downward
pressure on the wick cleaner to keep it level and touching the
rim of the burner basket (P151000). When the rising wick
reaches the cleaner, black carbon will come through the three
holes. This will soon stop and your wick will be clean
and properly shaped for further use.
|
Wipe the rim of the burner basket
clean before replacing the flame spreader. The wick must be kept
shaped at the correct angle and this can only be done with the wick
cleaner provided. Never use scissors, razor blades, etc.
CLEANING THE HEATER
A dirty heater may smell and can even be dangerous,
particularly if fluff or carbon is blocking any of the air holes.
Wipe off any paraffin which as been spilt during filling and clean
regularly to get rid of all dust, fluff and carbon. Take out the
flame spreader (P159903) and burner basket (P151000) for cleaning and
don't forget to clean the gallery (P159918) which can be seen at the
bottom of the chimney when the heater is open. Hot soapy water can
be used as long as none gets in the tank or on t he wick, but you must
never use abrasives.
RESHAPING THE WICK
If the top edge of the wick becomes unevenly burnt
away and one side of the flame is much higher than the other, or burning
yellow, you must not use the heater until the wick has been
reshaped. Put the heater where the smell won't matter, and let it
burn completely out. Careful use of the wick cleaner now, and for
the next day or two of normal burning, will fully restore the shape of
the wick.
FITTING NEW WICK
Carefully used, your wick will last a remarkably long
time, but when it will no longer turn up enough get a new one - forcing
the wick winder will only result in an unnecessary repair bill. If
you don't like handling a wet wick, burn the heater dry, but remember
that it will smell.
Take out the flame spreader (P159903) unscrew the
burner basket (P151000) and turn the wick up fully. [English Blue Flame. You will see
that two arms "C" hold the wick. Pull them apart and move one
towards and one away from you. Pull off the old wick and replace
the flame spreader.] [Japanese Blue Flame. Turn the wick up until the cog is free and then pull the wick and carrier out of the tank.
Disengage the teeth on either side of the wick by pressing the top of the wick above the teeth and draw the old wick out of the carrier.]
Handle the new wick carefully so that you do not damage the top edge and ease it down until the brass studs can be re-engaged with the holes in the wick carrier
arms "C". If the wick tail on the winder side has been caught up in the raiser mechanism inside the tank, free it so that it reaches the bottom. Refill the tank and
let the wick soak for an hour before lighting the heater.
During the past 30 years, millions of people have
used Aladdin heaters with complete satisfaction. Recently,
however, many people have told us of the serious troubles they have
experienced with their heaters owing to the fact that they have been
persuaded to use wicks not of our manufacture and not marked Aladdin.
These wicks are not suitable for Aladdin heaters. It is in your
interest to refuse such wicks, because we cannot accept any
responsibility for the performance or reliability of any of our
appliances unless genuine Aladdin spare parts are used.
COOKING
If you want to boil water or cook, remove the top
cover (P151910) to expose the boiling ring. In some export models
a lifting tool (P150246), which fits into one of the holes in the top
cover is provided with the heater and is housed underneath the tank,
where the wick cleaner is also then housed.
MAINTENANCE
Replace any damaged or worn out part immediately with
a genuine Aladdin spare - we cannot accept any responsibility if
substitutes are used.
Once a year you should rinse out the tank with clean
paraffin and fit a new wick.
If you cannot get the SAFE BLUE FLAME or are in any
difficulty, take the heater to your nearest Aladdin stockist.
Never use a heater which is not working properly.
POINTS TO REMEMBER
1. Use paraffin (domestic kerosine) only -
petrol (gasoline) is dangerous.
2. Don't add salt or anything else to the
fuel - it's useless and harmful.
3. Don't fill or carry the heater whilst it is
alight.
4. Don't dry clothes over, or too near, the
heater.
5. Always provide adequate ventilation.*
6. Maintain the SAFE BLUE FLAME. If
you can't - but the heater out!
7. Replace damaged parts immediately.
8. Use only Aladdin spares - others can be
dangerous.
9. Watch where you put it - particularly
with children around.
10. Don't use in a draught.
*Most rooms are adequately ventilated if there is an
unblocked flue or an air brick together with a fanlight or window
slightly open. NEVER USE YOUR OIL HEATER IN A ROOM WHICH HAS
BEEN COMPLETELY SEALED AGAINST DRAUGHTS.
SPECIFICATIONS
Heat output = BTU's per hour = 5,870 to 9,320.
Equivalent to 1 3/4 - 2 3/4 kilowatts.
Consumption = 25 - 16 hours per gallon.
Approximate capacity = one gallon (4 - 5 liters)
Click images below to expand into a .pdf file.

